
What Is A Mac Dock?
A Mac Dock is a distinct feature of any device operated by Apple’s Macintosh (Mac) operating software. The Dock was introduced with Mac OS X for the first time.
A Mac Dock is a small panel across the edge of the screen primarily located at the bottom of the screen and acts as a launching pad for applications, files, and folders.
It enables quick access to your favorite applications and folders only by clicking at their icons on the dock. Although Apple places system applications by default on the app, they can be easily edited and replaced with an icon of your desired application or file.
Designed to imitate an animated taskbar, the Mac Dock reflects a rippling effect as the cursor is moved along. The icons magnify as the cursor moves across them to create this effect.
Moreover, it provides further customization for Mac users as they can edit the magnification and the size of the icons along with deciding where to locate the Mac Dock and whether to hide the Mac Dock or not.
How To Add Our Preferred Apps To The Mac Dock
Follow these steps to add your desired apps to the Mac Dock:
- Launch Finder Window from your Mac Dock
- Click on ‘Applications’ in the left sidebar
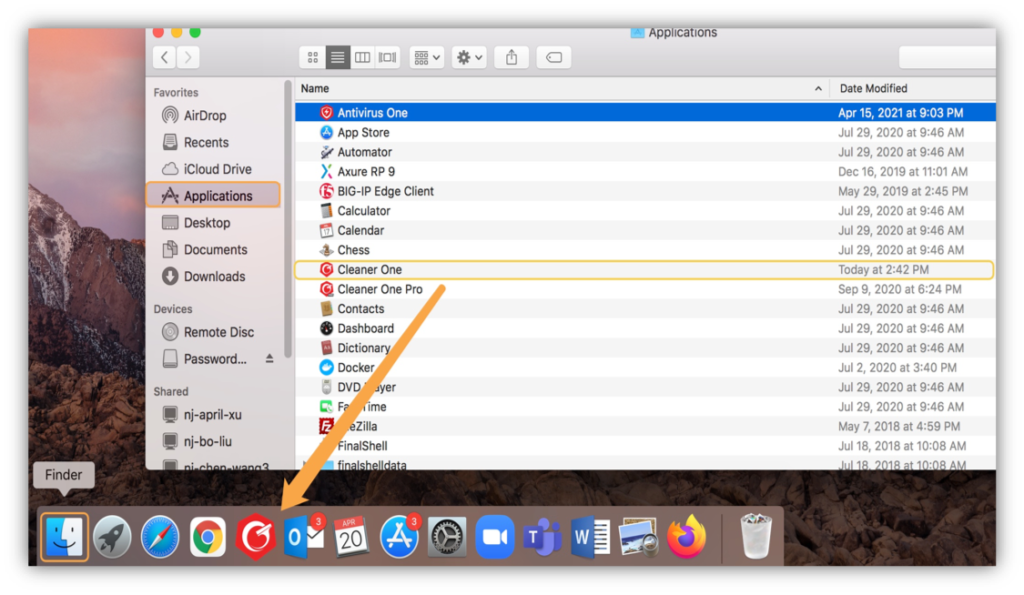

- Now select the app you want to be on the Dock.
- Hover above the dock and release the button
Sometimes, an application is currently being run in the Mac Dock, and you may want it to remain there permanently. Here’s how you can do it:
- Go on the app icon displayed on the Dock and right-click on the icon.
- Select ‘Options’ in the pop-up window.
- Select the ‘Keep in Dock’ option.


How to Add Files and Folders to Your Mac Dock
Alongside applications, files and folders that you need to access frequently can also be kept in the Dock.
However, files and folders are only placed in the far right of the Dock, after the app shortcuts. Mac Dock makes a clear distinction between applications and files/folders by drawing a virtual line between them in the Dock.
To add folders and files to the Dock:
- Launch the Finder window from the Mac Dock.
- Select the preferred file or folder by accessing its location and drag it to the right side of the Dock; where files and folders are located.
- Hover above the deck and let go of the folder.
How to Remove Applications, Files or Folders from the Mac Dock
The Dock contains some applications and folders that are added to it by default. Moreover, it also includes items you previously wanted to access quickly and don’t need on the Dock now (previous work projects for example).
You might want to remove such items from the Dock. An important point to remember is that removing an item from the Dock does not mean the item is deleted; instead, it only removes the shortcut from the Mac Dock.
To remove an item from the Dock:
- Select an item (app, file or folder) from the Dock and drag it out.
- As you remove an item, you will see a ‘Remove’ window appear above the item.
- Let go of the application or folder, and it will disappear from the Dock.

If you do this with an item that is currently open, its icon will continue to show on the Mac Dock until you quit the application or folder.
How to Change the Dock Size
The Mac Dock permits customization of the icon size and the magnitude by which it’s magnified in the ripple effect which was mentioned above. In order to enlarge or reduce the icon size, you have to adjust the Mac Dock size.
To adjust the Dock size:
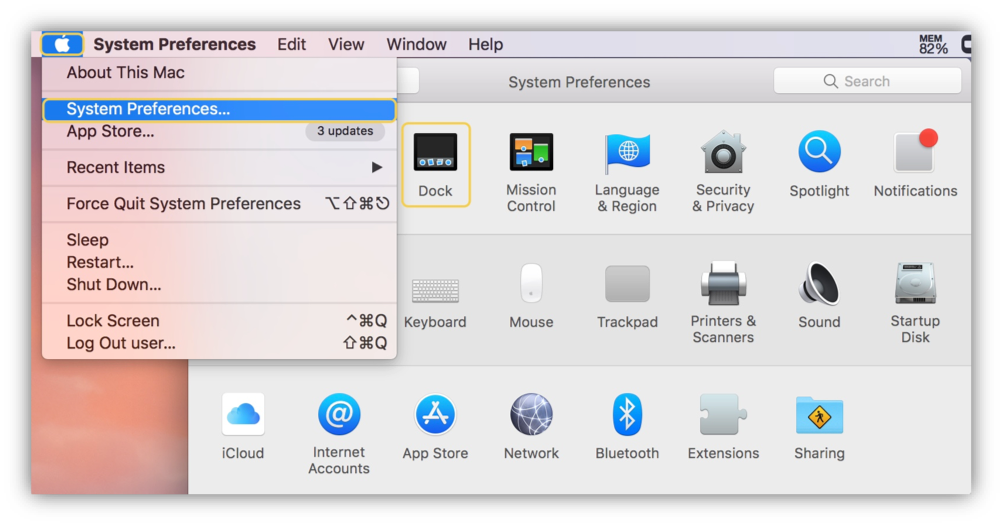
- Locate the Apple icon on the top left corner of your Mac screen. Click on it.
- From the menu that follows, click on ‘System Preferences.’
- Select Dock.
- The following window will contain a ‘size slider.’ The size slider will determine the size of the Dock and thus, the icons. It increases the size on the left and decreases it on the right.
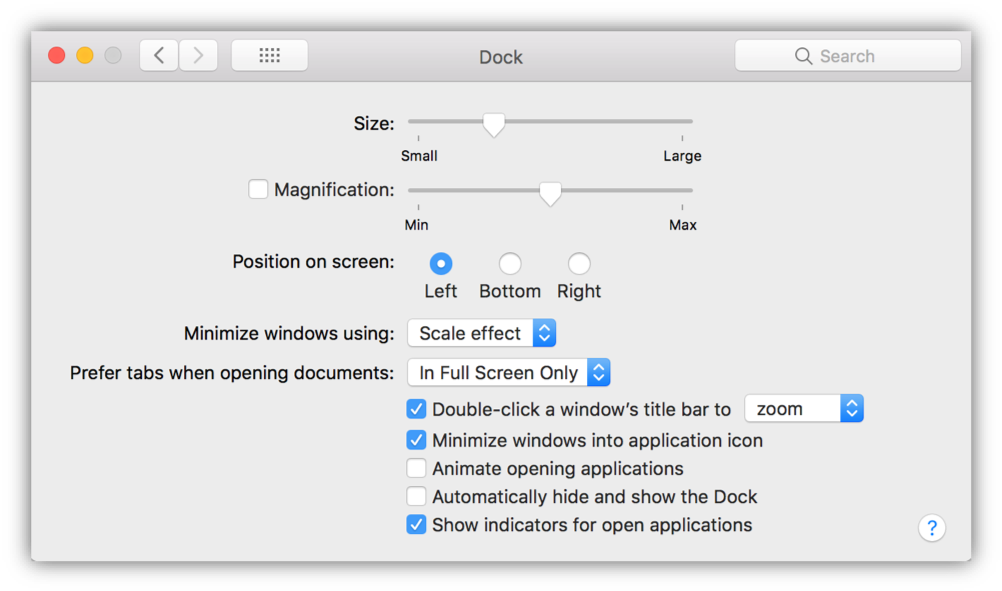
- To enable the ripple effect, tick on the box ‘Magnification’ which is located right below the size slider. The magnification enlarges the icon when your cursor hovers above it.
- To customize the extent of magnification, there is a ‘size slider’ again. Adjust the size as per your desire. The size increases on the left and vice versa.


The method mentioned above is the widely recommended and preferred way to change the Mac Dock size, but there is a shorter way around this whole process.
Mac users can also modify Dock size by following the steps below:
- Positioning the cursor over the ‘divider’ which divides Dock applications from Dock folders.
- The cursor will change into a double-sided arrow in that area.
- Now click and drag the cursor wide to increase the Dock size, and drag narrow to decrease the Dock size.
How to Change Mac Dock’s Orientation On the Mac Screen
Mac Dock is predominantly located at the bottom panel of the screen on Mac OS devices. However, it is up to you.
You can place the Mac Dock in the bottom panel (horizontal), right panel or left panel (both are vertical) of your screen.
To change Mac Dock’s orientation:
- Locate the Apple Logo in the top left corner of your screen.
- Click on System Preferences from the menu that follows.
- Select Dock.
- Select your preferred orientation: bottom, left or right.

Additionally, you can also change the Dock location using a simpler method:
- Hold down the Shift key and click on the Divider.
- Drag the Mac Dock to left, right or bottom sides of the screen.
- Let go when Dock changes to the desired location.
How to Hide the Dock
Sometimes users do not want a stagnant Dock to take up screen space or affect a better, broader view of their screens. This is particularly true for smaller screen laptops where every inch of screen space matters.
Hiding the Mac Dock results in the Dock being invisible on the screen unless you want to access it. In this case, the Dock reappears when you hover your cursor over the place where it is located (bottom, right or left panels of the screen).
To hide the Dock, follow these steps:
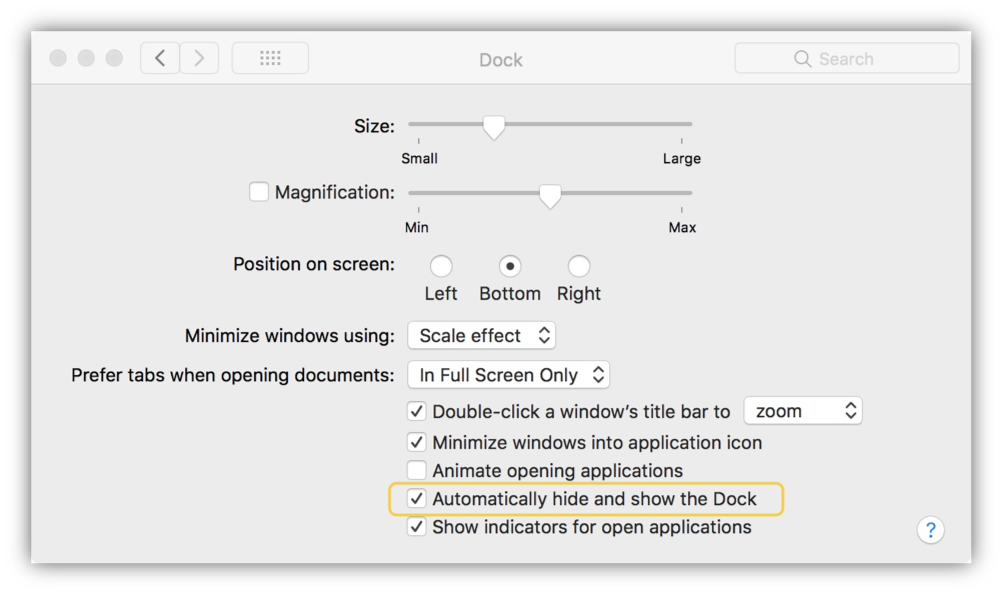
- Locate the Apple Logo in the top left corner of your screen.
- Click on System Preferences from the menu that follows.
- Select Dock.
- Select the option ‘Automatically hide and show the Dock.’

How to Keep the Dock On One Screen When Using Dual Monitor Setup
A dual monitor setup is not only aesthetically pleasing but also improves efficiency.
Working on two monitors helps you handle different tasks without continually switching tabs and a clear view of the two monitors at the helm.
However, Mac users have had a constant complaint while applying a dual monitor setup. The problem is that the Mac Dock is displayed on all the screens. Since the launch of Mac OS 10.9 (Mavericks), Apple has introduced the feature that displays the Mac Dock on all the screens.
The Dock visible across all screens has irritated Mac users, and most want it to remain at one single screen. There are multiple ways to achieve a single screen Dock.
Using Mission Control
Mission control supports hot corners, as well as different keyboard and mouse shortcuts.
If you want to keep the Mac Dock limited to oine screen in a dual screen setup, follow these steps:
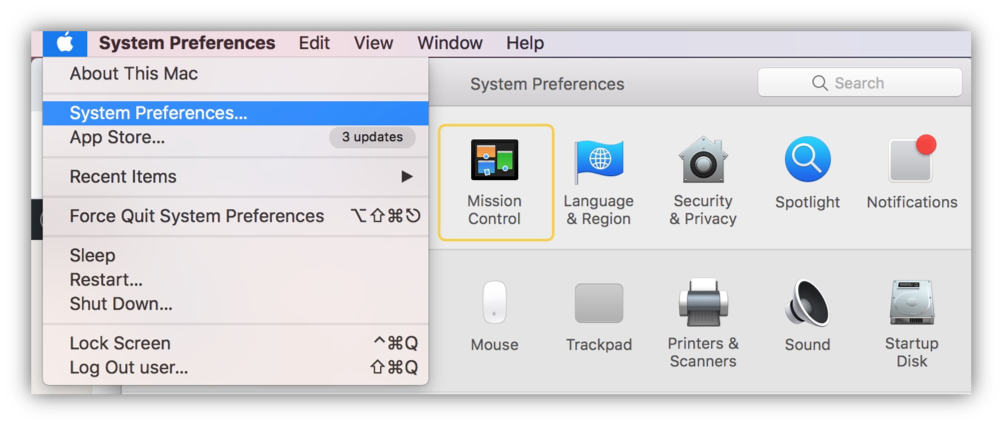
- Click on the Apple logo in the left corner of your screen
- Click on System Preferences from the menu that follows.
- Click on the ‘Mission Control.’ The upcoming menu will contain ‘Displays have a separate spaces’ option.
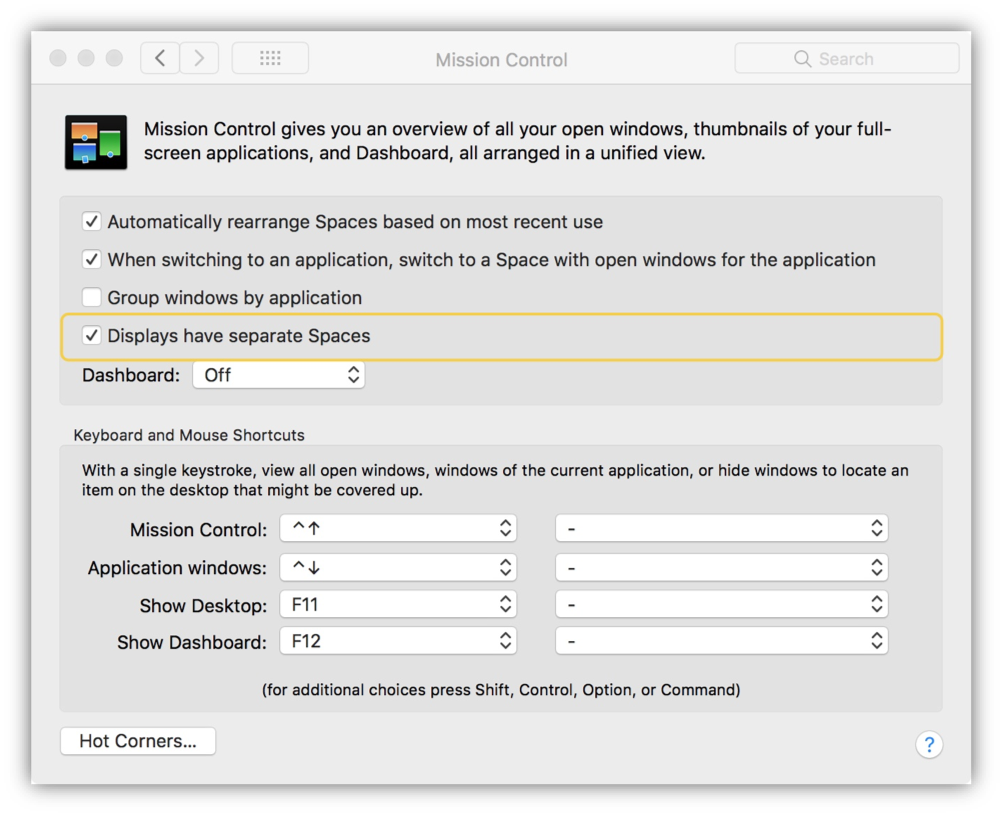


After you have selected this option, the Dock will only remain at your primary screen, but at a cost. This option also prohibits your secondary screen from displaying a separate menu bar and different applications.
Mission Control also offers you to set keyboard and mouse shortcuts. These shortcuts are useful for displaying desktop or dashboard on separate monitors only after clicking a few keys.


You would think that Apple would have gotten around to fix this. If you want a fixed size dock at the bottom of ONE screen, you are hosed. This drove me crazy for years. I finally purchased a Dock replacement, uBar, that does what I want. For peace of mind it is worth every penny.
Selecting “Displays have separate Spaces” on Mission Control doesn’t make the dock stay on one page. At least it doesn’t on MacOS Catalina, version 10.15.7
Correction:
Selecting “Displays have separate Spaces” on Mission Control doesn’t make the dock remain at your primary screen. At least it doesn’t on MacOS Catalina, version 10.15.7
you need to de-select “Displays have separate Spaces” to lock your dock on primary screen.
Doesn’t work in Monteray 12.5 either, still goes to other screen.
>>> System Preferences >>> Desktop & Dock
UNCHECK “Group windows by application” as well as “Displays have separate Spaces”
NOTE: For this change to apply, you Must log out and then log back in.
Afterwards, your Dock should lock to the main monitor (Ex. your MacBook) Doing this , will keep your Dock on one screen, However there is a downside: You lose other dual-monitor features. Including each display having its own menu bar and apps being able to run in full-screen view on each display.