The incompatibility of Apple and Microsoft Windows has become a problem for a lot of users. Even the simple act of photo transferring appears to be a bit complicated when you are using an iPhone and a Windows PC at the same time. This tutorial will show you several methods to transfer photos from an iPhone to a Windows 10 PC.
Import with Windows Photos
This method requires a lightning-to-USB cable. Although the latest iPhone model only comes with a lightning-to-Type-C cable, we highly recommend getting a USB one as it will come in handy for situations like this.
1. Connect your iPhone to your computer using the cable. Click “Trust” if there’s a pop-up window on your phone asking “Trust this computer?”.
2. Click “Allow” if your phone asks “Allow this device to access photos and videos?”.
Make sure that your iPhone is unlocked during the whole process.
3. On the computer, click the Start button and go to Photos.
4. Click Import – From a USB device. Your iPhone should appear as one of the options on your screen.
5. Follow the instructions. It will take some time for the actual transfer.
Transfer with File Explorer
This is similar to the first method and also requires a USB cable, but you will not need to open Windows Photos.
1. Connect your iPhone to your computer using the cable.
Make sure that your iPhone is unlocked during the whole process.
2. On your computer, open File Explorer.
3. Select “This PC” from the list on the left. Your iPhone will appear in the main window.
4. Double-click your iPhone.
5. Double-click the DCIM folder. Inside, there will be folders with names such as 100Apple, 101Apple, etc. Your photos are stored in these folders.
6. You can transfer photos by copying them to other locations on your computer. If you delete any photo, it will be removed on your iPhone as well so be very careful when copying or moving photos.
Transfer using iCloud for Windows
For those who prefer a wireless way, here are the steps.
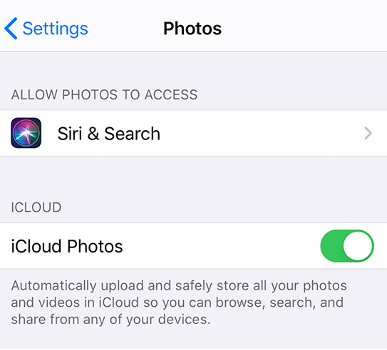
1. First of all, check if you have enabled iCloud services on your iPhone. Go to Settings – Photos, make sure iCloud Photos is turned on.

2. On your computer, download and install iCloud for Windows. (https://support.apple.com/en-us/HT204283)
3. Open iCloud for Windows, sign in using your Apple ID and put a check on Photos.

- If you want to double-check or change the location where your photos are stored on your PC, click Options.
- Your photos will automatically sync to your PC.
Manage all the photos
Photos can take up a lot of storage space on your PC and even slow down the speed of your computer. To avoid this, you need to delete photos that you do not need from time to time. Cleaner One Pro is an all-in-one disk cleaning manager that can scan for similar photos so that you can remove their duplicates easily. It also has other powerful features such as removing junk files, fixing common Windows problems, and managing startup items. Cleaner One Pro will make sure your PC is always at its best performance.


