MacOS community has developed significantly over the past years. While more and more developers have released MacOS version apps, some programs are still only available on Windows. If you have encountered such problems, do not worry as there is always a way around. This tutorial will show you several methods to run a Windows Software on a Mac.
Use Virtual Machine to run Windows on Mac
A Virtual Machine lets you run Windows within MacOS. This means that you do not need to actually have dual systems and switch between the two. Here are some popular Virtual Machine apps for MacOS:
1. Parallels https://www.parallels.com
This is probably one of the most powerful Virtual Machine apps. Although you need to pay for the official version, it is worth the money if you constantly need to run Windows software and you do not want to switch between two systems.
2. VMware Fusion https://www.vmware.com/products/fusion.html
VMware Fusion is similar to Parallels. However, you need to pay for the Virtual Machine function. You can also register for the free personal use license for VMware Fusion Player.
3. VirtualBox https://www.virtualbox.org
VirtualBox is an open source virtual machine tool. Although it is free, it also requires more professional and technical knowledge.
Run Windows Software with WineBottler
WineBottler (https://winebottler.kronenberg.org) is a third-party tool that can open Windows software on a Mac. The app itself comes with a wide range of Windows software selections that you can install directly.
If the Windows app you want to run is included in WineBottler,
1. Click the icon and select “Install.”
If you have the .exe file and just want to execute it,
1. Right-click the .exe file, select Open with – Wine.
2. When a pop-up window appears, select “Run directly.”
If you want to generate a MacOS app with the .exe file,
1. Right click the .exe file, select Open with – Wine.
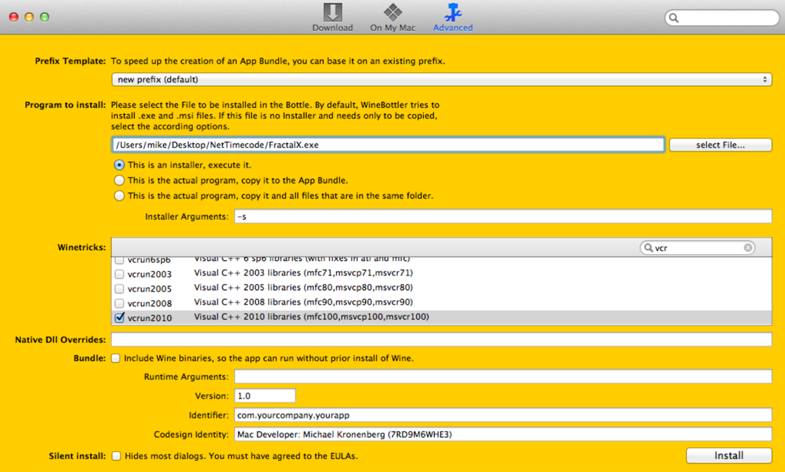
2. When a pop-up window appears, select “Convert to simple OS Application bundle with WineBottler.”
3. Then, the Advanced window will automatically open and you can create additional settings for the bundle.
Use Boot Camp to install Windows on your Mac
This is probably the most straightforward way—just install Windows on your Mac. The original macOS will still operate normally, and you will have an extra option for Windows. If there are a lot of Windows apps you need to install, we highly recommend this method.
1. Back up your personal files and data in case any accident occurs.
2. Check if your Mac is compatible.
MacBook: 2015 or newer.
MacBook Air, MacBook Pro, Mac mini and iMac: 2012 or newer
Mac Pro: 2013 or newer.
3. Make sure you have the following:
a. 64GB or more free storage space on the Mac startup disk.
b. An external USB flash drive that has 16 GB or more storage capacity.
c. A 64-bit version of Windows 10 on a disk image or other installation media.
d. Full security for Secure Boot setting.
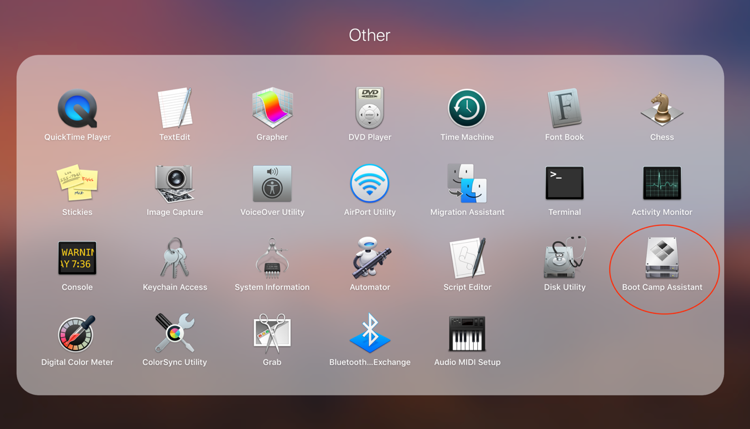
4. Open Boot Camp Assistant by going to Finder – Applications, or Launchpad – Other.
5. Follow the instructions that appeared on screen. Plug in the USB flash drive when asked to do so.
6. When the process is finished, your Mac will restart to the Windows installer. Select the BOOTCAMP partition and click Format when asked where to install.
7. Unplug unessential external devices and click Next to start the installation.
8. After the installation is completed, your Mac will start in Windows. Follow the “Welcome to the Boot Camp installer” instructions.
9. You can then download Windows software within the Windows system. To switch between Windows and macOS by restarting your Mac, and press and hold the Option or Alt Key during startup.


